Showing posts with label Jenkins CI. Show all posts

Sunday, July 20, 2014

TYPO3 6.2 - automated test execution and CGL code analysis for ExtBase extensions with Jenkins CI

Some of my public repositories on GitHub are integrated in Travis CI and Scrutinizer CI, so each new commit automatically starts a predefined build process where tests and code analysis are executed. For open source projects, the combination of GitHub, Travis CI and Scrutinizer CI is perfect. For private repositories, you can also use those services if you pay for them or you could built up the CI environtment yourself.

On work I've been using Jenkins CI for some years now to build our PHP, Java and Android projects. I'm also using Jenkins CI to process tests automation and code analysis for our TYPO3 extensions, which should be tested on different TYPO3 versions. This configuration was some kind of complicated, since each TYPO3 extension had to be installed in a working TYPO3 environment before it could be tested automatically by Jenkins CI. I've written a blogpost about this setup back in january 2013.

In this article I describe how I've setup a simple job in Jenkins CI for a TYPO3 6.2 ExtBase extension. The job executes the standalone unit tests and also does some TYPO3 CGL code analysis. Everything shown below should be seen as an example, since some analysis tasks like code coverage or pdepend are missing.

Prerequisites
  • A running Jenkins CI server with at least the Git Plugin and the PHP Plugin
  • ANT, composer, phpunit, phpmd and phpcs installed on the Jenkins CI server
  • Jenkins workspace dir configured with ${ITEM_ROOTDIR}/workspace/
  • The TYPO3 CMS CGL installed as a global standard
  • An ExtBase extension with some working unit tests
Creating the ANT build file

As fas as I know it is still best to use ANT for PHP projects on Jenkins CI. Therefore I created an ANT build file, which contains some tasks for the build. The ANT build file is added to my ExtBase extension (e.g. my_extkey/Resources/Private/Build/build.xml).

The first task will just create some directories.

<target name="init">
   <mkdir dir="${env.WORKSPACE}/build"/>
   <mkdir dir="${env.WORKSPACE}/build/phpcs"/>
   <mkdir dir="${env.WORKSPACE}/build/phpunit"/>
   <mkdir dir="${env.WORKSPACE}/typo3_core"/>
</target>

The final structure of the workspace should look like shown below.
  • build/ - contains build results 
  • jobname/ - the name of the Jenkins CI job. In this example the TYPO3 extension key
  • typo3_core/ - path for the TYPO3 core
The next task I've created is the task for the unit tests execution. I'll clone the current TYPO3 6.2 master branch, install all dependencies with composer, create typo3conf, typo3temp and uploads folder, symlink the extbase extension to typo3conf/ext/ and finally execute the unit tests.

<target name="unittests">
    <exec executable="git" failonerror="true">
        <arg line="clone --single-branch --branch master --depth 1 https://github.com/TYPO3/TYPO3.CMS.git ${env.WORKSPACE}/typo3_core" />
    </exec>

    <exec executable="composer">
        <arg line="install --working-dir ${env.WORKSPACE}/typo3_core" />
    </exec>

    <mkdir dir="${env.WORKSPACE}/typo3_core/uploads"/>
    <mkdir dir="${env.WORKSPACE}/typo3_core/typo3temp"/>
    <mkdir dir="${env.WORKSPACE}/typo3_core/typo3conf/ext"/>

    <symlink link="${env.WORKSPACE}/typo3_core/typo3conf/ext/${env.JOB_NAME}" resource="${env.WORKSPACE}/${env.JOB_NAME}"/>

    <exec executable="phpunit" dir="${env.WORKSPACE}/typo3_core">
        <arg line="--log-junit ${env.WORKSPACE}/build/phpunit/unittests.xml  --bootstrap typo3/sysext/core/Build/UnitTestsBootstrap.php typo3conf/ext/${env.JOB_NAME}/Tests/Unit" />
    </exec>
</target>

Note that I'll set the task to fail on error if the TYPO3 core could not be cloned. 

Finally I'll add some code analysis tasks and a cleanup task to remove some files from the build.

<target name="phpcs">
    <exec executable="phpcs">
        <arg line="--report=checkstyle --report-file=${env.WORKSPACE}/build/phpcs/checkstyle.xml --standard=TYPO3CMS --extensions=php,inc ${env.WORKSPACE}/${env.JOB_NAME}" />
    </exec>
</target>

<target name="phpmd">
    <exec executable="phpmd">
        <arg line=" ${env.WORKSPACE}/${env.JOB_NAME} xml codesize,unusedcode,naming,design --reportfile ${env.WORKSPACE}/build/messdetector.xml --exclude Tests/" />
    </exec>
</target>

<target name="phpcpd">
    <exec executable="phpcpd">
        <arg line=" --log-pmd ${env.WORKSPACE}/build/phpcpd.xml ${env.WORKSPACE}/${env.JOB_NAME}" />
    </exec>
</target>

<target name="cleanup">
    <delete dir="${env.WORKSPACE}/typo3_core"/>
</target>

The complete ANT build file can be found here. It should be generic so it can be used with a common ExtBase extension without any further modifications.

Update 02.01.2015

I updated the ANT build file so it also supports the execution of functional tests.

Jenkins CI job setup

The job setup on Jenkins CI is as shown on the next screenshots.

The ANT script assumes, that the job name is equal to the TYPO3 extension key. So I'll setup the job in Jenkins CI as shown above.

The job name must be TYPO3 extension key
In the SCM settings you have to make sure, that the source code is cloned to a seperate directory named like the extension key.

The ExtBase extension should be cloned in a seperate directory
Next I'll set the path to the ANT build.xml file.

ANT configuration
After the build, the code analysis should be processed.

Post build analysis


And finally the results of the phpunit tests should be evaluated.

PHPUnit result analysis

I've configured the build just to be instable, if a unit test fails (set threshold to zero). You can also configure the build to fail, if a certain amount of failed/incomplete tests are reached.

After some builds, you'll end up with a Jenkins CI job, that shows some graphs of the code analysis.

Code analysis graph
If the build contains failing tests, then the build status will become "instable" and the build will show, which tests failed.

Build with one failed test

Outlook and conclusion

As written before, the Jenkins CI job I've shown above should be seen as an simple example. I did not add any build triggers and executed the jobs manually. In a production CI environment this task should be automated, so each new commit to the repository will trigger the build.

Also I did not add any functional tests to the TYPO3 ExtBase extension, because this would require MySQL database access and would make the ANT script and the job setup more complicated. Cloning the whole TYPO3 master branch each time the job executes could also be done more simple, if you have a clone of the repository locally somewhere and just copy all files from there.

Depending on you requirements, you could also add Selenium tests (follow this article on how to setup a Selenium Grid on Jenkins CI) to the job or you could take another step forward and completely automate the deployment of the ExtBase Extension.

Anyhow, I hope I could give you a little insight in using Jenkins CI to automate some tasks a TYPO3 developer should take care of.

By the way: When I wrote this article, I did a clean installation of Jenkins CI in my home network and configured everything from scratch to see, if the example shown in this article works as expected. This all just took me about 1-2 hours until I had a working CI environment.

Saturday, March 16, 2013

Setting up Jenkins CI, Selenium grid and PHPUnit Selenium to perform integration testing

When developing bigger TYPO3 websites with a lot of own extensions and complex functionality, it is nescessary to make sure, that the integration of new features or changes to existing code does not break the functionality of the website.

To meet those requirements, it is recommended to use a continuous integration platform (like Jenkins CI) to automate the testing of the software. The platform can be used to automatically run the unit tests of your TYPO3 ExtBase extensions. If you use the testing framework included in the TYPO3 extension "phpunit", the tests can also help you testing your code with real data from the database.

Another thing you can (and should) test is the website and it's functionality itself. To do so, you can use a browser automation tool to run automated tests against real browsers. One tool available is the Selenium Server.

In this article I will show you how to build up a continuous integration solution consiting of Jenkins CI, Selenium Grid and 3 nodes with different webbrowsers and operating systems. Finally I will show you how to create some simple selenium tests with PHPUnit selenium and show, how to automatically run them against different environment configurations. Please note, that I will not go into deep details installing and configuring each software.

Setting up Jenkins CI and Selenium Grid

First of all, you need to install Jenkins CI on a server. For this article, a fresh Debian Server has been installed with all dependencies for Jenkins CI and finally, the latest release of Jenkins CI has been downloaded from the Jenkins CI homepage. Installation and configuration is really simple as described here. After installation and configuration, Jenkins CI is ready for use. To run PHPUnit tests, make sure you have installed PHPUnit, PHPUnit Selenium and all necessary extensions you need to run your tests.

The next step is to install and configure Selenium on the Jenkins CI server. This instance of Selenium will run Selenium Grid, which will act as the master Selenium grid hub, where all other Selenium nodes connect to. Open the Jenkins Plugin manager and install the Selenium plugin. Installation is really easy and you just have to install the plugin and restart your Jenkins CI. In the Jenkins CI web interface you now have the new menu "Selenium grid" as shown on the screenshot below.


Selenium Grid is ready to handle nodes. Now it is time to configure the Selenium nodes.

Configuring the Selenium nodes

For this article, 3 virtual machines with different browser configurations have been created and configured.

  • Windows XP 32 bit with the following webbrowsers
    • Internet Explorer 8
    • Firefox 19
    • Opera 12
    • Chrome 25
  • Windows 7 32 bit with the following webbrowsers
    • Internet Explorer 9
    • Firefox 19
    • Opera 12
    • Chrome 25
  • Ubuntu 12.10 64 bit with the following webbrowsers
    • Firefox 19
    • Chrome 25

For all virtual machines, JAVA and the browsers listed above has been installed. Chrome, Opera and Internet Explorer requires drivers, so the locally installed Selenium Server can remote control the local webbrowser. Those drivers can be downloaded here or directly via the Selenium homepage. Finally, the latest release of  Selenium has been downloaded to the machines.

For all nodes, the following command has been used to start Selenium.


java -jar \path\to\selenium-server-standalone-2.29.0.jar -role node -hub http://jenkins-server:4444/grid/register -browser "browserName=internet explorer,version=8,maxInstances=1" -browser "browserName=firefox,version=19,maxInstances=5" -browser "browserName=opera,version=12,maxInstances=5" -browser "browserName=chrome,version=25,maxInstances=5"


The node connects to the master Selenium hub and registers the local browsers to the hub. Note, that the parameter "-browser" does not accept spaces in between the individual arguments.

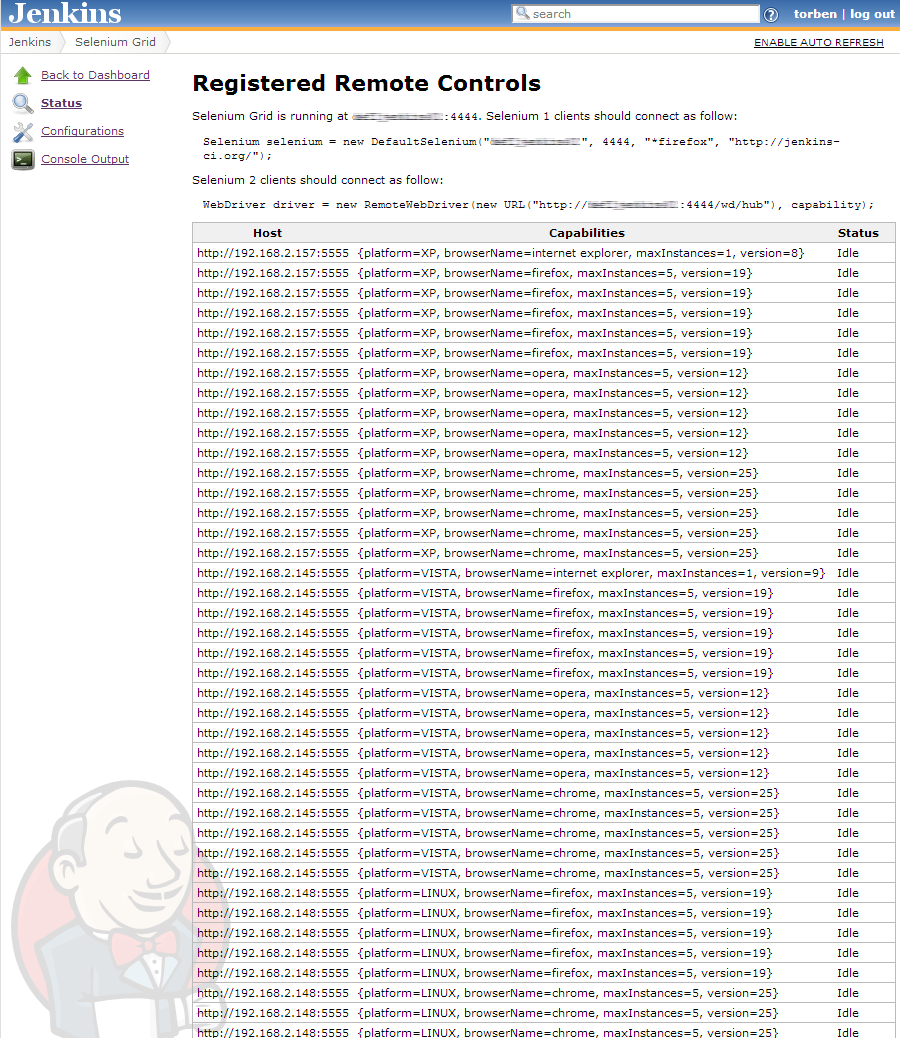
After all nodes have been configured and the local Selenium Server has been started, the Selenium Grid plugin in Jenkins CI should show all registered nodes as shown on the screenshot below.


The Selenium Grid and all nodes are now ready for usage.

The first Selenium tests

Now you are ready to write the first test. Create a new PHP file (selenium-tests.php) and include the following contents.

<?php
class DefaultTest extends PHPUnit_Extensions_Selenium2TestCase {

    /*
     * Setup
     */
    protected function setUp() {
        $this->setHost('your-jenkins');
        $this->setBrowser('internet explorer');
        $this->setBrowserUrl('http://www.google.com');
    }

    /**
     * @test
     */
    public function testTitle() {
        $this->url('http://www.google.com');
        $this->assertEquals('Google', $this->title());
    }
}
?>

Use the setHost() method to set the hostname of your jenkins. This can be an IP-Address or a hostname. Do not include any ports - PHPUnit Seleniums does this for you.

Before setting up a job in jenkins (which I do not show in this article), you can run the test locally by using the following command.

phpunit selenium-tests.php

Now the test is sent to the Selenium Grid server and executed an a node matching the desired browser.

The result should look like shown below

PHPUnit 3.7.13 by Sebastian Bergmann.

.

Time: 6 seconds, Memory: 6.00Mb

OK (1 test, 1 assertion)

Now we want to execute the test on a node with Internet Explorer version 8. To do so, we need to set the desired capabilities of the test. Modify the file selenium-tests.php to the following:

<?php
class DefaultTest extends PHPUnit_Extensions_Selenium2TestCase {

    /*
     * Setup
     */
    protected function setUp() {
        $this->setHost('your-jenkins');
        $this->setDesiredCapabilities( array('version' => '8') );
        $this->setBrowser('internet explorer');
        $this->setBrowserUrl('http://www.google.com');
    }

    /**
     * @test
     */
    public function testTitle() {
        $this->url('http://www.google.com');
        $this->assertEquals('Google', $this->title());
    }
}
?>

Now run the test again and you should see on the Windows XP machine, that Internet Explorer 8 is launched and the URL www.google.com is opened.

That's all. You can modify the desired capabilities to suit the needs of your tests. Since the parameter accepts an array, you can also set the browser version and the target platform together.

The last step is to check in your tests to a repository (e.g. GIT) and setup a new job in Jenkins to execute the selenium tests periodically.

Friday, January 25, 2013

Configuring Jenkins CI to use multiple TYPO3 versions as build target for Extbase extensions


If you develop TYPO3 extbase extensions, you should know the concepts of test driven development (TDD). Covering as much as possible of your code with tests ensures, that new code or code changes don't break the functionality of your extension. In bigger projects, where several developers work together on an Extbase extension, it is helpfull to use a continuous integration server to automate testing and to ensure code quality.

If the Extbase extension must be compatible with different TYPO3 versions, you have to ensure this during the development process. In this situation, it can be helpful to run automated tests with different TYPO3 versions as build target.

In this article, I will show how to configure a single job in Jenkins CI to use multiple TYPO3 versions as a build target for  running Extbase extension tests.

Before you can start to configure the job in Jenkins CI, you must configure different TYPO3 installations on the server where Jenkins CI is located. This is necessary, because running phpunit tests against an Extbase extension requires the extension to be installed on an working TYPO3 installation.

Configuring the TYPO3 installations

TYPO3 basic setup
On the Jenkins CI Server, you create 3 new virtual hosts. Each virtual host contains a TYPO3 installation with a different version of TYPO3 (4.5.x, 4.7.x and 6.0.x). To keep the TYPO3 installation maintainable, you can symlink each TYPO3 source to a central place on the server, so you easily can update TYPO3 build versions (e.g. version 4.5.20 to 4.5.21)

After the TYPO3 setup, each TYPO3 installation can be opened locally by a hostname like the following
  • http://typo3-45.build.jenkins.local/
  • http://typo3-47.build.jenkins.local/
  • http://typo3-60.build.jenkins.local/
Setting permissions
Next you have to login to each TYPO3 installation and update some settings in the install tool.

Set the file mode mask to:
[BE][fileCreateMask] = 0666 
[BE][folderCreateMask] = 0777

This is necessary for TYPO3 6.0, because there seems to be some problems with local permissions in typo3temp/ (Uncaught TYPO3 Exception: #1294586098: Lock file could not be created) when running the tests through Jenkins CI. 

Installing and configuring the TYPO3 extension "phpunit"
In order to run automated tests in a TYPO3 installation, you have to install the extension "phpunit" from TER. Be sure to get a compatible version of phpunit for each TYPO3 version you use. 

After the extension "phpunit" has been installed, you must create a backend user named "_cli_phpunit". Just create the user and set a random password. 

Make sure, that you can at least execute the tests which came with "phpunit" successfully. This step only ensures, that tests actually can be run successfully.

Setting up the job in Jenkins

The next step is to configure the job in Jenkins. First of all, we create an empty job in Jenkins.


The next step is to create an ANT Build File (built.xml), which contains all settings for  the job. Below is an example ANT Build File for the job described in this article.

<project name="TYPO3-Extbase-Extension" default="build" basedir=".">
        <property name="output" location="${basedir}/build/"/>
        <property file="build.properties" />

        <target name="init">
                <mkdir dir="${output}"/>
                <mkdir dir="${output}/phpcs/"/>
        </target>

        <target name="build" depends="init, typo3-45-unittests, typo3-47-unittests, typo3-60-unittests, phpcs, phpmd, phpcpd">
        </target>

        <target name="typo3-45-unittests">
                <exec executable="php" failonerror="true">
                        <arg path="${typo3path-45}/typo3/cli_dispatch.phpsh" />
                        <arg value="phpunit" />
                        <arg path="${basedir}/src/Tests" />
                </exec>
        </target>

        <target name="typo3-47-unittests">
                <exec executable="php" failonerror="true">
                        <arg path="${typo3path-47}/typo3/cli_dispatch.phpsh" />
                        <arg value="phpunit" />
                        <arg path="${basedir}/src/Tests" />
                </exec>
        </target>

        <target name="typo3-60-unittests">
                <exec executable="php" failonerror="true">
                        <arg path="${typo3path-60}/typo3/cli_dispatch.phpsh" />
                        <arg value="phpunit" />
                        <arg path="${basedir}/src/Tests" />
                </exec>
        </target>

        <target name="phpcs">
                <exec executable="phpcs">
                        <arg line="--report=checkstyle
                                --report-file=${output}/phpcs/checkstyle.xml
                                --standard=/var/lib/jenkins/external_libraries/PHP_CodeSniffer/TYPO3/ruleset.xml
                                ${basedir}" />
                </exec>
        </target>

        <target name="phpmd">
                <exec executable="phpmd">
                        <arg line=" . xml codesize,unusedcode,naming,design --reportfile ${output}/messdetector.xml --exclude Tests/" />
                </exec>
        </target>

        <target name="phpcpd">
                <exec executable="phpcpd">
                        <arg line=" --log-pmd ${output}/phpcpd.xml ." />
                </exec>
        </target>
</project>

The ANT Build File also requires a configuration file (built.properties) with some properties.

php=/usr/bin/php5
typo3path-45=/var/www/path-to-your-typo3-45-root
typo3path-47=/var/www/path-to-your-typo3-47-root
typo3path-60=/var/www/path-to-your-typo3-60-root

After both files have been created, copy them to the /workspace directory of your job. At his point, the workspace directory should not exist and you have to create it manually. Make sure you set the correct permissions, so the jenkins user has read-write permissions to that directory.

The next thing you have to do is to configure the repository, where Jenkins CI checks out the TYPO3 Extbase extension. In this article, the Extbase extension is located in a GIT Repository. Configure the Repository URL, the Branch and set the "Local subdirectory for repo (optional)" to "src". Below is a screenshot of the settings.


Now you have to configure the ANT Build File. Just insert the path to the Build File as shown below.


The ANT Build File above also contains some settings for phpcs, phpmd and phpcpd. If you want to use Checkstyle, PHP messdetection and PHP duplicate code detection, you can configure those settings in the Post-Build Actions as shown on the screenshot below.


Now your job is ready to run the first time. Actually it will fail, since the configuration process is not finished yet, but it is required to run the job, so the Extbase extension is checked out from the GIT repository.

Installing the Extbase extension and running the job

After running the job the first time, you should have the folder /src inside the jobs workspace directory. This folder contains the extension, which we now symlink to the /typo3conf/ext directory of each TYPO3 installation we created earlier. Make sure, that the name of the symlink is identical to the extension key.

The symlink ensures, that updates to the extension automatically are available in all TYPO3 installations.

Now you have to login to each TYPO3 installation and install the Extbase extension with the extension manager.

When the Extbase extension is installed, you are ready to run the job and will (hopefully) see, that your Extbase extension´s tests will run on all configured TYPO3 versions.


You can also configure the job only to use a special TYPO3 version as build target as shown below.

The above example will only run tests against TYPO3 version 4.5.

Additional notes

During the development process of an extension, the table-structure may change due to new or changed fields. Those changes are not automatically updated in the local TYPO3 installations, where the extension is installed, so you have to make sure, that you update the extension´s table structure by using the extension manager in each TYPO3 installation, if you made changes to the extension´s table structure.