Tuesday, December 9, 2014

TYPO3 6.2 - Still some problems with newsletter image rendering

I've done a lot of TYPO3 4.5 to TYPO3 6.2 migrations the last weeks and struggled with some strange behaviour of TYPO3 6.2 in combination with newsletter pages and the TYPO3 Extensions direct_mail and direct_mail_subscription.

I'm pretty sure, some people might run into the same problems during the usage of TYPO3 6.2 and direct_mail / direct_mail_subscription, so I'll describe how I solved the most common problems in this article.

Update 01.01.2015

The first two problems are solved now and you can use renderMethod = table in TYPO3 6.2 and 7.x directly with css_styled_content.

Newsletter pages not rendering images


In order to display HTML newsletters in various e-mail clients it is recommended to output the page layout in old-school HTML table design. In order to do so, I use the following TypoScript for images.


tt_content.image.20.renderMethod = table

This renders image-output in table design and enables the editor to set alignments for images in newsletters. In TYPO3 6.0 and 6.1 I had some major problems with using css_styled_content with the renderMethod shown above, so I used to include the css_styled_content configuration for TYPO3 v4.7 as described in my former blogpost.

This all worked fine for TYPO3 sites migrated from 6.x to TYPO3 6.2. With TYPO3 sites, created directly with TYPO3 6.2, this did'nt work any more and images were just not rendered. I spent several hours of debugging to find out, that a setting in the LocalConfiguration.php was the cause for this. Sites, that have been migrated from TYPO3 6.x to TYPO3 6.2 had [FE][activateContentAdapter] enabled in the Install tool.

After I enabled the [FE][activateContentAdapter] for the directly created TYPO3 6.2 sites, images were rendered correctly with the css_styled_content (v4.7) configuration.


Anyway, the install tool shows a warning, that setting activateContentAdapter is slow, so this only seems to be a temporary solution.

In my opinion a better solution would be to use css_styled_content which comes with TYPO3 6.2 and deactivate [FE][activateContentAdapter], but at the time of writing, there is a bug (see problem below) preventing me from using that option.

Image rendering buggy using TYPO3 6.2 css styled content and renderMethod = table


When I tried to debug my former problem with images not being rendered in page output, I also tried to use css_styled_content from TYPO3 6.2 directly. This resulted in the images being rendered incorrectly (see screenshots below).

3 TYPO3 Logos in TYPO3 backend - each with an individial label in the image

The output using css_styled_content with renderMethod = table results in the following output.

Resulting image output shows 4 images and only the last image is rendered


This seems to be a problem in TYPO3 6.2 and there is also an issue on Forge for this one. I will try to create created a patch, so both the linked and related issues can be closed.

Newsletter not sent to recipient


The last problem I spent some time with is, that newly subscribed recipients did not receive the sent newsletter. As I only send out HTML newsletters, I used to set the following TypoScript in the configuration for direct_mail_subscription


plugin.feadmin.dmailsubscription {
  create {
    overrideValues.module_sys_dmail_html = 1
  }
}

It seems, that this does not work with the latest versions of direct_mail_subscription, so newly created records in tt_address did not contain the nescecary flag. I tried several other approaches including setting hidden input fields for the field mod_sys_dmail_html to the registration form and setting TCAdefaults, but all approaches did'nt work. At least the issue is known, so a fix for this problem may be available soon.

To work around this issue, I set the default value for the field mod_sys_dmail_html to 1 directly in the database by using the following SQL


ALTER TABLE `tt_address` CHANGE `module_sys_dmail_html` `module_sys_dmail_html` tinyint(3) unsigned NOT NULL DEFAULT '1';

Make sure, that this setting may be reverted, if you use the database analyzer in the install tool and apply the original default value for the field.

Friday, November 7, 2014

TYPO3 CMS - Event management extension with registration option

Today I've published the first release of my latest extension "Event management and registration" (sf_event_mgt) for TYPO3 CMS. The extension enables TYPO3 editors to manage events in the TYPO3 backend and can show a list- and a detail-view for upcoming, past or all events in the frontend. The list-view can be extended by individual layouts as known from the TYPO3 news extension (tx_news), so it should for example be possible to create a nice image slider for all upcoming top-events.

As events also could require a registration process (e.g. if the number of participants is limited), I added a registration option, so users can register for an event. TYPO3 editors can assign a maximun value for participants to each individual event, so it can not be over-booked. The registration contains a double opt in process, so users must confirm, that they actually have registered for the event. To ensure, that new registrations are processed in time by the registering user, a validity for confirmation-links can be configured.

Event record in TYPO3 backend

The extension also comes with a backend module, which enables TYPO3 editors to get an overview of all available events. Also the backend module contains a CSV-Export option for events where registration is enabled, so a list of registered participants easily can be exported.

Event backend administration module
The backend module also contains a notification module, where TYPO3 editors can send e-mail notifications to all participants of an event (e.g. if the event has been cancelled). Notification templates can be configured individually with some lines of TypoScript and with a Fluid template.

Notification module to send notifications to participants
Finally, the extension has some nice features, which are more technical, but makes the extension very flexible and extendible. Of course, the extension comes with a documentation ReST format which explains all features in detail.

I've tried to keep the code quality at a high level, respected the TYPO3 CGL as much as possible and also "Event management and registration" is fully covered by tests (which does not mean it is bug-free).

The extension is available on TER and bugs as well as feature requests can be reported on GitHub, where also the source code of the extension is hosted.


Saturday, October 25, 2014

TYPO3 Neos - Set a dynamic sender/recipient for a mailform

I've been starting using TYPO3 Neos for some weeks now and I am really impressed. In so many places you just see how much high quality work, time, effort and love has been put into the product by the TYPO3 Neos team - thumbs up!

In one of my first projects I created a simple contact form like shown in the TYPO3 Neos Integrators Cookbook. There was only one thing I had some problem with and this was to set the sender e-mail address of the form dynamically, so the recipient of an e-mail form just can press the "reply" button in the e-mail app to directly send an answer to the person who filled out the contact form.

I really could'nt find a solution for my problem on the internet, so after digging into the code of the TYPO3.Form EmailFinisher, I finally found some help in the description of the class. You can use submitted form fields as placeholders for every option of the EmailFinisher like shown below.


finishers:
  -
    identifier: 'TYPO3.Form:Email'
    options:
      templatePathAndFilename: resource://Vendor.Site/Private/Templates/Email/Contact.txt
      subject: Contact from website
      recipientAddress: office@example.net
      recipientName: 'Office of Company'
      senderAddress: '{email}'
      senderName: '{name}'
      format: plaintext

With this configuration in the Yaml for the contact form, the sender e-mail address and the sender name will be used from the submitted from data. Of course you can also set the recipient e-mail address dynamically the same way.

Keep in mind, that setting the sender e-mail address like shown may cause some problems with local spamfilters. To prevent potential problems, you could whitelist the webservers IP address directly in the spamfilter.

Saturday, September 27, 2014

TYPO3 extension sf_tv2fluidge with new features and improvements


Today I uploaded version 0.4.0 of the TYPO3 extension sf_tv2fluidge on TER. The new version comes with a lot of improvements and does also contain new features. Below follows an overview of all changes:
  • Added support for static pages and flexible content elements with static DS
  • Added migration of page TV Flexform (migration to database fields, if exist)
  • Added module to convert TemplaVoila references to "insert records" elements
  • Refactored migration of multilingual FCEs and content
  • Removed optional conversion for TemplaVoila references in FCE and Content Conversion module
  • Support for Grid Elements with aliases
  • Small bugfixes
  • Raised compatibility level to TYPO3 6.2
Due to the changes, the migration process changed a little bit, so make sure you read the extension manual carefully.

Big thanks goes to Gernot Leitgab and Andreas Allacher who contributed all changes made.

Wednesday, September 10, 2014

Security considerations when working with TYPO3 Formhandler extension

First of all: This article does not show any existing security problems with formhandler. It shows you two real world examples, which I found on a TYPO3 website I did not create, but had to do maintenence for. I will also show what I have done, to (hopefully) resolve the problems.

The TYPO3 extension formhandler is known as the swiss army knife, when it comes to all kind of forms in TYPO3. Formhandler is flexible in many ways and allows a TYPO3 integrator not just to create complex forms with several validation options, but also to prefill fields when a form is loaded or to save/update fields in the TYPO3 database when a form is successfully submitted. I really like this extension and use it in many projects because of it's clean structure, flexibility and because it is actively maintained.

Formhandler is often not just used to create simple contact forms, but also to provide forms which shows, creates or modifies records from/in the TYPO3 database. If the TYPO3 integrator does not think about security at this point, there are several things that can go wrong.

I'm not really a security expert, so if I write totally nonsence in this article, feel free contact me, so the article will contain correct and helpfull information for others.

Example 1 - PreProcessor_LoadDB and GP variable causing leackage of sensitive data

In the first example, a website user does submit data through a form from a third party extension. After the data is submitted, the user receives an e-mail containing a link to a formhandler page, where the user has to fill out some other form fields. The link, which is sent to the user is like shown below:

http://www.domain.tld/myform.html?formname[uid]=123

The parameter "formname[uid]" contains the uid of the newly created record from the third party extension.

When I opened the form the first time, I did not see anything special (expect from the URL parameter). All form fields where empty, so I asked myself, why the URL contained the parameter. After I had a look at the output of the website, I knew, what the URL was used for. The output of the website contained 3 hidden formfields like shown below:

<input type="hidden" name="formname[uid]" value="123">
<input type="hidden" name="formname[recipientname]" value="John Doe">
<input type="hidden" name="formname[email]" value="email@domain.tld">

Ouch, now I could easily find out, who else did submit data through the form from the third party extension by just increasing/decreasing the uid. The original TYPO3 integrator used a PreProcessor_LoadDB preprocessor to load the additional data in the hidden fields.

Depending on how the database lookup is integrated, it could result in a SQL injection, if you just pass the given UID directly to the select.where of the PreProcessor_LoadDB preprocessor.

Example 2 - Finisher_DB and GP variable causing unwanted data manipulation

The second example uses the same form as shown in example 1. When a website user fills out the form, all fields get submitted to the server and an e-mail ist sent with a Finisher_Mail finisher. As you may guess, the recipient email is taken from the hidden input field, which in case is very bad, since you just can replace the e-mail address in the hidden field with another e-mail address and after form submission, a totally different recipient will receive an e-mail sent from the server.

If you don't think it can get worst, it actually will. The formhandler setup did also contain a Finisher_DB finisher, which updated some fields on a given record in the TYPO3 database. Since the uid to this record is parsed directly through GET/POST variables, it can just be changed and within that, you can just submit the form with different uids and update the fields that the Finisher_DB updates with garbage - of course for all records in the table.

Problem summary and solution approach

All named problems rely on the some cause - user input is just seen as trusted. At no point it is actually checked, if the user has changed the uid or has replaced the values from hidden input fields with own content.

Actually, to take benefit from PreProcessor_LoadDB to prefill fields with Database values or Finisher_DB to update records, you actually need to know the uid from the record where to fetch/update the desired values. So how can you make sure, that the uid is not changed by the user?

Adding a HMAC to the URL

We can add a second parameter to the URL, that contains the HMAC for the uid parameter. This HMAC will later on be used to validate, if the uid has been modified by the user.

TYPO3 has a HashService (TYPO3\CMS\Extbase\Security\Cryptography\HashService), which can be used to generate and validate HMACs. To generate a HMAC for a given string, the TYPO3 HashService uses the TYPO3 encryption key as shared secret. The function generateHmac($string) returns a HMAC for a given string as shown below (short version without type/encryption key check)

hash_hmac('sha1', $string, $encryptionKey);

The TYPO3 HashService also has a function called validateHmac($string, $hmac) to validate, if the given string matches a given HMAC.

Using the generateHmac function, I end up with formhandler URLs like shown below:

http://www.domain.tld/myform.html?formname[uid]=123&formname[uidhmac]=averylonghmac

Adding HMAC check to formhandler

Formhandler has interceptors, which can be used on init and on save of a form. Init-interceptors are called each time a form is displayed and save-interceptors are called before the form-finishers are executed. So the best approach to add the HMAC check is to do this through an own interceptor.

I created a configurable interceptor, which is able to use the validation functions from the TYPO3 HashService.

The source code for the new interceptor is available in this gist. You can just create an own extension with this class and then use it in the formhandler TypoScript settings. Below follows an example TypoScript setup, which uses the new interceptor.

initInterceptors.1 {
  class = Tx_MyFormhandlerExtension_Interceptor_HashService
  config {
    redirectPage = 11
    validateHmac {
      fields.uid = uidhmac
    }
  }
}  

The configuration above now validates, if the given uidhmac is the correct HMAC for the given uid. If this validation fails, the user is redirected to a configured page.

You can also use the interceptor with appended HMAC string. Those HMACs are created using the appendHmac function in the HashService. Basically it just takes the given string and appends the HMAC for the string to it. An url could look like shown below.

http://www.domain.tld/myform.html?formname[appendedhmac]=123averylonghmac

To validate the given appended HMAC string you can use the interceptor as shown below.

initInterceptors.1 {
  class = Tx_MyFormhandlerExtension_Interceptor_HashService
  config {
    redirectPage = 11
    validateAndStripHmac {
      fields.1 = appendedhmac
    }
  }
}  

Conclusion

Nearly all described problems from the two examples have been solved with the new interceptor. A user can now not just increase/decrease the GET/POST parameter uid to retreive the personal data of other users and he/she can may also not be able to update other database records, if the interceptor is also configured as a save-interceptor.

The only problem that remains is, that a user can replace the fetched e-mail-address with different one. I simply resolved this issue by removing the e-mail-address from the output and doing a lookup for it in a special save-interceptor I created.

I've created a patch for formhandler and maybe the new interceptor can make it as a core feature of formhandler.

So always remember: Don't trust user input and always think twice when working with user generated data.

Sunday, July 20, 2014

TYPO3 6.2 - automated test execution and CGL code analysis for ExtBase extensions with Jenkins CI

Some of my public repositories on GitHub are integrated in Travis CI and Scrutinizer CI, so each new commit automatically starts a predefined build process where tests and code analysis are executed. For open source projects, the combination of GitHub, Travis CI and Scrutinizer CI is perfect. For private repositories, you can also use those services if you pay for them or you could built up the CI environtment yourself.

On work I've been using Jenkins CI for some years now to build our PHP, Java and Android projects. I'm also using Jenkins CI to process tests automation and code analysis for our TYPO3 extensions, which should be tested on different TYPO3 versions. This configuration was some kind of complicated, since each TYPO3 extension had to be installed in a working TYPO3 environment before it could be tested automatically by Jenkins CI. I've written a blogpost about this setup back in january 2013.

In this article I describe how I've setup a simple job in Jenkins CI for a TYPO3 6.2 ExtBase extension. The job executes the standalone unit tests and also does some TYPO3 CGL code analysis. Everything shown below should be seen as an example, since some analysis tasks like code coverage or pdepend are missing.

Prerequisites
  • A running Jenkins CI server with at least the Git Plugin and the PHP Plugin
  • ANT, composer, phpunit, phpmd and phpcs installed on the Jenkins CI server
  • Jenkins workspace dir configured with ${ITEM_ROOTDIR}/workspace/
  • The TYPO3 CMS CGL installed as a global standard
  • An ExtBase extension with some working unit tests
Creating the ANT build file

As fas as I know it is still best to use ANT for PHP projects on Jenkins CI. Therefore I created an ANT build file, which contains some tasks for the build. The ANT build file is added to my ExtBase extension (e.g. my_extkey/Resources/Private/Build/build.xml).

The first task will just create some directories.

<target name="init">
   <mkdir dir="${env.WORKSPACE}/build"/>
   <mkdir dir="${env.WORKSPACE}/build/phpcs"/>
   <mkdir dir="${env.WORKSPACE}/build/phpunit"/>
   <mkdir dir="${env.WORKSPACE}/typo3_core"/>
</target>

The final structure of the workspace should look like shown below.
  • build/ - contains build results 
  • jobname/ - the name of the Jenkins CI job. In this example the TYPO3 extension key
  • typo3_core/ - path for the TYPO3 core
The next task I've created is the task for the unit tests execution. I'll clone the current TYPO3 6.2 master branch, install all dependencies with composer, create typo3conf, typo3temp and uploads folder, symlink the extbase extension to typo3conf/ext/ and finally execute the unit tests.

<target name="unittests">
    <exec executable="git" failonerror="true">
        <arg line="clone --single-branch --branch master --depth 1 https://github.com/TYPO3/TYPO3.CMS.git ${env.WORKSPACE}/typo3_core" />
    </exec>

    <exec executable="composer">
        <arg line="install --working-dir ${env.WORKSPACE}/typo3_core" />
    </exec>

    <mkdir dir="${env.WORKSPACE}/typo3_core/uploads"/>
    <mkdir dir="${env.WORKSPACE}/typo3_core/typo3temp"/>
    <mkdir dir="${env.WORKSPACE}/typo3_core/typo3conf/ext"/>

    <symlink link="${env.WORKSPACE}/typo3_core/typo3conf/ext/${env.JOB_NAME}" resource="${env.WORKSPACE}/${env.JOB_NAME}"/>

    <exec executable="phpunit" dir="${env.WORKSPACE}/typo3_core">
        <arg line="--log-junit ${env.WORKSPACE}/build/phpunit/unittests.xml  --bootstrap typo3/sysext/core/Build/UnitTestsBootstrap.php typo3conf/ext/${env.JOB_NAME}/Tests/Unit" />
    </exec>
</target>

Note that I'll set the task to fail on error if the TYPO3 core could not be cloned. 

Finally I'll add some code analysis tasks and a cleanup task to remove some files from the build.

<target name="phpcs">
    <exec executable="phpcs">
        <arg line="--report=checkstyle --report-file=${env.WORKSPACE}/build/phpcs/checkstyle.xml --standard=TYPO3CMS --extensions=php,inc ${env.WORKSPACE}/${env.JOB_NAME}" />
    </exec>
</target>

<target name="phpmd">
    <exec executable="phpmd">
        <arg line=" ${env.WORKSPACE}/${env.JOB_NAME} xml codesize,unusedcode,naming,design --reportfile ${env.WORKSPACE}/build/messdetector.xml --exclude Tests/" />
    </exec>
</target>

<target name="phpcpd">
    <exec executable="phpcpd">
        <arg line=" --log-pmd ${env.WORKSPACE}/build/phpcpd.xml ${env.WORKSPACE}/${env.JOB_NAME}" />
    </exec>
</target>

<target name="cleanup">
    <delete dir="${env.WORKSPACE}/typo3_core"/>
</target>

The complete ANT build file can be found here. It should be generic so it can be used with a common ExtBase extension without any further modifications.

Update 02.01.2015

I updated the ANT build file so it also supports the execution of functional tests.

Jenkins CI job setup

The job setup on Jenkins CI is as shown on the next screenshots.

The ANT script assumes, that the job name is equal to the TYPO3 extension key. So I'll setup the job in Jenkins CI as shown above.

The job name must be TYPO3 extension key
In the SCM settings you have to make sure, that the source code is cloned to a seperate directory named like the extension key.

The ExtBase extension should be cloned in a seperate directory
Next I'll set the path to the ANT build.xml file.

ANT configuration
After the build, the code analysis should be processed.

Post build analysis


And finally the results of the phpunit tests should be evaluated.

PHPUnit result analysis

I've configured the build just to be instable, if a unit test fails (set threshold to zero). You can also configure the build to fail, if a certain amount of failed/incomplete tests are reached.

After some builds, you'll end up with a Jenkins CI job, that shows some graphs of the code analysis.

Code analysis graph
If the build contains failing tests, then the build status will become "instable" and the build will show, which tests failed.

Build with one failed test

Outlook and conclusion

As written before, the Jenkins CI job I've shown above should be seen as an simple example. I did not add any build triggers and executed the jobs manually. In a production CI environment this task should be automated, so each new commit to the repository will trigger the build.

Also I did not add any functional tests to the TYPO3 ExtBase extension, because this would require MySQL database access and would make the ANT script and the job setup more complicated. Cloning the whole TYPO3 master branch each time the job executes could also be done more simple, if you have a clone of the repository locally somewhere and just copy all files from there.

Depending on you requirements, you could also add Selenium tests (follow this article on how to setup a Selenium Grid on Jenkins CI) to the job or you could take another step forward and completely automate the deployment of the ExtBase Extension.

Anyhow, I hope I could give you a little insight in using Jenkins CI to automate some tasks a TYPO3 developer should take care of.

By the way: When I wrote this article, I did a clean installation of Jenkins CI in my home network and configured everything from scratch to see, if the example shown in this article works as expected. This all just took me about 1-2 hours until I had a working CI environment.

Friday, June 27, 2014

Standalone unit- and functional tests for ExtBase extensions in TYPO3 6.2

The TYPO3 core team did a lot of work in the last weeks to simplify unit- and functional testing in TYPO3, so now everything about testing TYPO3 core and TYPO3 extensions has become much more clear and straightlined. In this article I will describe how I switched the unit- and functional tests in one of my TYPO3 extensions from cli_dispatch to standalone phpunit tests.

Initial situation

I am working an an event management and registration extension for TYPO3. Since I always work with unit- and functional tests and a CI environment, I've setup my IDE PHPStorm to execute unit- and functional tests as described in my old blogpost and I also integrated the extension in Travis CI and Scrutinizer CI. Since the extension only should be compatible with TYPO3 6.2+, I already used the new functional tests introduced in TYPO3 6.2 instead of the functional testing framework which comes with the TYPO3 extension phpunit.

Standalone unit tests for PHPStorm

Helmut Hummel wrote an excellent article about how to execute TYPO3 Unit tests in PHPStorm. I've setup my unit tests as descibed in Helmut's article, but with one difference. Instead of configuring the unit test bootstrap file as described in step 5, I created a PHPUnit configuration file, which holds all PHPUnit configuration and which later on also will be used on Travis CI for test execution.

Unit tests use an alternative configuration file
The configuration file for PHPUnit is like shown below.

<phpunit
        backupGlobals="false"
        backupStaticAttributes="false"
        bootstrap="../../../../../typo3/sysext/core/Build/UnitTestsBootstrap.php"
        colors="true"
        convertErrorsToExceptions="true"
        convertWarningsToExceptions="true"
        forceCoversAnnotation="false"
        processIsolation="false"
        stopOnError="false"
        stopOnFailure="false"
        stopOnIncomplete="false"
        stopOnSkipped="false"
        verbose="false">

    <testsuites>
        <testsuite name="EXT:sf_event mgt">
            <directory>../Unit/</directory>
        </testsuite>
    </testsuites>
</phpunit>

After I had setup everything, I executed my unit tests, which actually did not run. With my old setup and within the TYPO3 extension PHPUnit, the tests executed successfully. After some hours of debugging, I fixed the failing tests. I had to do more mocking inside my tests, so they really could run independent from a working TYPO3 installation.

Standalone functional tests for PHPStorm

The configuration for functional tests in PHPStorm is similar to the unit test setup with some small differences. You must switch on PHPUnit process isolation and you must configure database settings, if you do not run the tests in an working TYPO3 CMS installation. Documentation about functional tests in TYPO3 can be found in the TYPO3 wiki about functional testing.

Since I want to run the functional tests without a working TYPO3 CMS installation and also on Travis CI, I configured a PHPUnit configuration file and added environment variables for database access to the PHPStorm Run/Debug configuration.

Environment variables for functional tests
The PHPUnit configuration file is like shown below:

<phpunit
        backupGlobals="false"
        backupStaticAttributes="false"
        bootstrap="../../../../../typo3/sysext/core/Build/FunctionalTestsBootstrap.php"
        colors="true"
        convertErrorsToExceptions="true"
        convertWarningsToExceptions="true"
        forceCoversAnnotation="false"
        processIsolation="true"
        stopOnError="false"
        stopOnFailure="false"
        stopOnIncomplete="false"
        stopOnSkipped="false"
        verbose="false">

    <testsuites>
        <testsuite name="EXT:sf_event mgt">
            <directory>../Functional/</directory>
        </testsuite>
    </testsuites>
</phpunit>

Note, that I've set processIsolation to true.

After I had setup the functional test configuration, my functional tests also did not work. Again this was caused incomplete mocking and also by direct usage of the ExtBase objectManager in my tests. After I completed the mocking and removed all direct usages of the objectmanager in the tests, the functional tests were executed successfully in PHPStorm.

Unit and functional tests on Travis CI and code analysis on Scrutinizer CI

My TYPO3 extension was already integrated in Travis CI and Scrutinizer CI. Since I switched from test execution through cli_dispatch to standalone unit test execution, I had to modify my Travis CI configuration to execute tests directly through phpunit.

Both unit- and functional tests can be executed on commandline with the following commands:

phpunit -c typo3conf/ext/sf_event_mgt/Build/UnitTests.xml
phpunit -c typo3conf/ext/sf_event_mgt/Build/FunctionalTests.xml

Please note, that the test execution as shown above only works if the commands are executed from within a directory with a full TYPO3 CMS directory structure. In case of the functional tests, you must also set environment variables for Database access.

To get the test execution working on Jenkins CI, you just have to clone the TYPO3 core and create the TYPO3 directory structure (fileadmin, uploads and typo3conf/ext) and finally move your extension to typo3conf/ext/. After that, you're ready to execute both unit- and functional tests on Jenkins CI.

My final .travis.yml file is like shown below:

language: php
php:
  - 5.3
  - 5.4

env:
  - DB=mysql TYPO3_BRANCH=master COVERAGE=0

matrix:
  include:
    - php: 5.5
      env: DB=mysql TYPO3_BRANCH=master COVERAGE=1

notifications:
  email:
    - derhansen@gmail.com

before_script:
  - cd ..
  - git clone --single-branch --branch $TYPO3_BRANCH --depth 1 https://github.com/TYPO3/TYPO3.CMS.git typo3_core
  - mv typo3_core/* .
  - sudo apt-get install parallel
  - composer self-update
  - composer install
  - mkdir -p uploads typo3temp typo3conf/ext
  - mv sf_event_mgt typo3conf/ext/

script:
  - >
    if [[ "$COVERAGE" == "0" ]]; then
      echo;
      echo "Running unit tests";
      ./bin/phpunit --colors -c typo3conf/ext/sf_event_mgt/Tests/Build/UnitTests.xml
    fi
  - >
    if [[ "$COVERAGE" == "1" ]]; then
      echo;
      echo "Running unit tests";
      ./bin/phpunit --coverage-clover=coverage.clover --colors -c typo3conf/ext/sf_event_mgt/Tests/Build/UnitTests.xml
    fi
  - >
    if [[ "$COVERAGE" == "1" ]]; then
      echo;
      export typo3DatabaseName="typo3";
      export typo3DatabaseHost="localhost";
      export typo3DatabaseUsername="root";
      export typo3DatabasePassword="";
      find . -wholename '*/typo3conf/ext/sf_event_mgt/Tests/Functional/*Test.php' | parallel --gnu 'echo; echo "Running functional test suite {}"; ./bin/phpunit --colors -c typo3conf/ext/sf_event_mgt/Tests/Build/FunctionalTests.xml {}'
    fi
  - >
    if [[ "$COVERAGE" == "1" ]]; then
      echo;
      echo "Uploading code coverage results";
      wget https://scrutinizer-ci.com/ocular.phar
      cp -R typo3conf/ext/sf_event_mgt/.git .
      php ocular.phar code-coverage:upload --format=php-clover coverage.clover
    fi

In order to get functional tests to execute successfully, you must provide TYPO3 database credentials and the TYPO3 database name as shown in the config above.

The Travis CI configuration file already includes code coverage analysis through Scrutinizer CI. In the last part of the configuration, the code coverage results are uploaded to Scrutinizer.

Merging unit- and functional test code coverage data

[EDIT 28.06.2014] It seems I have missed one thing regarding code coverage. With cli_dispatch test execution, both unit- and functional tests run at the same time resulting in one file with code coverage data (if code coverage is switched on). With standalone unit- and functional tests, tests are seperated in at least 2 runs. The config for Travis CI I posted above just handles code coverage for unit tests and not for funtional tests. Also, the Travis CI config runs functional tests in parallel to speed up functional test execution. To include code coverage data from both unit- and functional tests, I changed to Travis CI config as following for the functional test execution.

find . -wholename '*/typo3conf/ext/sf_event_mgt/Tests/Functional/*Test.php' | parallel --gnu 'echo; echo "Running functional test suite {}"; ./bin/phpunit --coverage-clover={}functionaltest-coverage.clover --colors -c typo3conf/ext/sf_event_mgt/Tests/Build/FunctionalTests.xml {}'

With this change, phpunit creates one file with code coverage data for each functional test suite. Keep in mind, that this will really slow down functional test execution.

And for the upload of code coverage data to Scrutinizer CI I changed the following:

find . -wholename '*/typo3conf/ext/sf_event_mgt/Tests/Functional/*Test.php' -exec php ocular.phar code-coverage:upload --format=php-clover {}functionaltest-coverage.clover \;

This uploads each file with code coverage data for functional tests to scrutinizer CI. The Scrutinizer CI configuration must now be changed as shown below.

external_code_coverage:
    timeout: 700
    runs: 3

With this change, Scrutinizer CI waits for 3 code coverage data uploads and merges them, so finally the code analysis end up with code coverage data from all unit- and functional test. There is one downside with this settings. The number of runs must be changed manually depending on the amount of test suites with code coverage data you have in your project. But finally, Scrutinizer CI shows the same code coverage as PHPStorm.


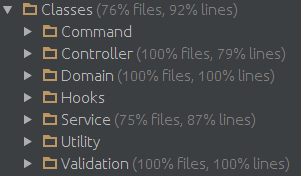
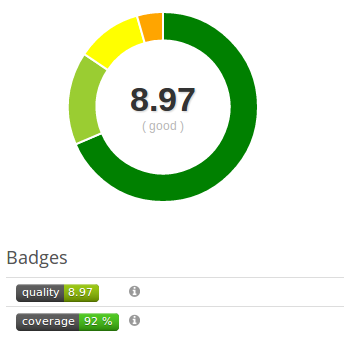
Code coverage in PHPStorm and Scrutinizer CI both show 92%

Conclusion

The switch from cli_dispatch to standalone test execution for ExtBase extensions is'nt really complicated. Test setup for unit- and functional tests has become much more easy and clear now and I think (and hope) that standalone unit- and functional tests will reduce the barriers for TYPO3 extension developers to actually create TYPO3 Extension with good test coverage.

I would like to thank all people in the TYPO3 community who made standalone tests possible. I really appreciate the work that has been done.

Tuesday, June 10, 2014

TYPO3 - How to prevent empty FlexForm values from getting saved

When you create an ExtBase extension you can use a FlexForm to enable the user to change some of the TypoScript settings you define for the extension directly in the plugin settings. As an example, you could assume that your ExtBase extension has the following TypoScript settings:

plugin.tx_myext {
  settings {
    myFirstSetting = A value
    mySecondSetting = Another value
  }
}

If you add a FlexForm to your extension with two input fields, where the user can change both "myFirstSetting" and "mySecondSetting", then you will be able to access the user configured settings in your extension controllers through an array which is available in $this->settings. But - if the user just configures one of the two settings resets an already set setting in FlexForm to an empty value, then the second setting will be saved with an empty value and you have to merge the TypoScript and FlexForm settings manually in your controller and manually control, which setting overrides each other.

There has been a lot of discussion about this problem in the TYPO3 mailinglist and on forge and as far as I could find out, a solution is'nt implemented very easy, since you have to decide for each individual field, if you want to let an empty Flexform setting override a predefined TypoScript setting. Georg Ringer did a lot of work on handling this override-behaviour in his great News-Extension, where you define a TypoScript setting named "overrideFlexformSettingsIfEmpty", which contains all fields which should be overridden by TypoScript values, if the FlexForm contains empty values.

There is nothing wrong with the solution show in the News-Extension and in the ExtBase Wiki, but I took a different approach and tried to find out if it is possible to prevent empty FlexForm values from getting saved to the database when the plugin configuration is saved, so you don't have to do the merge/override manually.

Outgoing from the example described above the table tt_content contains a record for the ExtBase plugin, which holds the FlexForm configuration as XML. For the case, that the user just configured one of the two settings by FlexForm, the content in the field pi_flexform contains the following:


<?xml version="1.0" encoding="utf-8" standalone="yes" ?>
<T3FlexForms>
    <data>
        <sheet index="sDEF">
            <language index="lDEF">
                <field index="settings.myFirstSetting">
                    <value index="vDEF">A value</value>
                </field>
                <field index="settings.mySecondSetting">
                    <value index="vDEF"></value>
                </field>
            </language>
        </sheet>
    </data>
</T3FlexForms>

You will notice, that the setting mySecondSetting contains an empty value. This is the field I want to remove from the XML when saving the plugin configuration, since the setting should be overridden by the default value configured in TypoScript.

To do so, I used the TYPO3 core hook processDatamap_postProcessFieldArray, which allows me to modify the values being written to the database.

In ext_localconf.php I define the class to use for the DataHandler hook.


// DataHandler hook
$GLOBALS['TYPO3_CONF_VARS']['SC_OPTIONS']['t3lib/class.t3lib_tcemain.php']['processDatamapClass']['NAMESPACE.' . $_EXTKEY] = 'NAMESPACE\MyExt\Hooks\DataHandlerHooks';

Next I created the class containing the new processDatamap_postProcessFieldArray function. The contents of the file is as following.


<?php
namespace NAMESPACE\MyExt\Hooks;

/***************************************************************
 *
 *  Copyright notice
 *
 *  (c) 2014 Torben Hansen <derhansen@gmail.com>
 *
 *  All rights reserved
 *
 *  This script is part of the TYPO3 project. The TYPO3 project is
 *  free software; you can redistribute it and/or modify
 *  it under the terms of the GNU General Public License as published by
 *  the Free Software Foundation; either version 3 of the License, or
 *  (at your option) any later version.
 *
 *  The GNU General Public License can be found at
 *  http://www.gnu.org/copyleft/gpl.html.
 *
 *  This script is distributed in the hope that it will be useful,
 *  but WITHOUT ANY WARRANTY; without even the implied warranty of
 *  MERCHANTABILITY or FITNESS FOR A PARTICULAR PURPOSE.  See the
 *  GNU General Public License for more details.
 *
 *  This copyright notice MUST APPEAR in all copies of the script!
 ***************************************************************/

use TYPO3\CMS\Core\Utility\GeneralUtility;

/**
 * Hooks for DataHandler
 */
class DataHandlerHooks {

 /**
  * Checks if the fields defined in $checkFields are set in the data-array of pi_flexform. If a field is
  * present and contains an empty value, the field is unset.
  *
  * Structure of the checkFields array:
  *
  * array('sheet' => array('field1', 'field2'));
  *
  * @param string $status
  * @param string $table
  * @param string $id
  * @param array $fieldArray
  * @param \TYPO3\CMS\Core\DataHandling\DataHandler $reference
  *
  * @return void
  */
 public function processDatamap_postProcessFieldArray($status, $table, $id, &$fieldArray, &$reference) {
  if ($table === 'tt_content' && $status == 'update' && isset($fieldArray['pi_flexform'])) {
   $checkFields = array(
    'sDEF' => array(
     'settings.myFirstSetting',
     'settings.mySecondSetting'
    ),
   );

   $flexformData =  GeneralUtility::xml2array($fieldArray['pi_flexform']);

   foreach ($checkFields as $sheet => $fields) {
    foreach($fields as $field) {
     if (isset($flexformData['data'][$sheet]['lDEF'][$field]['vDEF']) &&
      $flexformData['data'][$sheet]['lDEF'][$field]['vDEF'] === '') {
      unset($flexformData['data'][$sheet]['lDEF'][$field]);
     }
    }

    // If remaining sheet does not contain fields, then remove the sheet
    if (isset($flexformData['data'][$sheet]['lDEF']) && $flexformData['data'][$sheet]['lDEF'] === array()) {
     unset($flexformData['data'][$sheet]);
    }
   }

   /** @var \TYPO3\CMS\Core\Configuration\FlexForm\FlexFormTools $flexFormTools */
   $flexFormTools = GeneralUtility::makeInstance('TYPO3\\CMS\\Core\\Configuration\\FlexForm\\FlexFormTools');
   $fieldArray['pi_flexform'] = $flexFormTools->flexArray2Xml($flexformData, TRUE);
  }
 }

}

In the function I have defined an array which holds sheet- and fieldnames, which should be removed if empty. Next I iterate through all sheets and fields configured in $checkFields to check, if they really are empty and if so, I just remove them from the array.

You may notice, that I converted the given XML structure to an array, so I can easily iterate through all sheets/fields. When everything is finished, I use the TYPO3 FlexFormTools to convert the array back to FlexForm XML.

After implementing the new function by the hook, the resulting FlexForm does not contain fields with empty values as defined in my function and I can now use $this->settings in my controller (or retrieving the settings through the configurationManager) without the need to manually merge/override TypoScript and FlexForm settings.

Please note, that I just tested the above with TYPO3 6.2.

Monday, April 21, 2014

TYPO3 6.2 - Random sorting of QueryResults

In one of my TYPO3 Extensions I use MySQL RAND() to randomize the result of returned records. Actually, I use exactly the method as described here in the comments. You take the original query, extract all statement parts, add RAND() to the sorting in the statement parts and then you rebuild the query and finally you set the SQL statement of the query.

In TYPO3 6.2 LTS, this method of generating a random resultset is not supported anymore, since the method buildQuery() has been removed from Typo3DbBackend. I first tried to just insert the original buildQuery() method in my code and call it, but since ExtBase in TYPO3 6.2 uses prepared statements, you can't use the original buildQuery method.

I really needed random sorting in my extension, so I debugged a couple of hours and came finally to the solution, that it would be best to extend the QueryResult class in ExtbaseAs the QueryResult class uses arrays to store the query result, it should be easy to use PHP shuffle function to randomize the sorting of the array.

My new class randomQueryResult has just some small enhancements as you can see below.

use TYPO3\CMS\Extbase\Persistence\Generic\QueryResult;

class RandomQueryResult extends QueryResult {

 /**
  * Keeps track of, if queryResult has been shuffled
  */
 protected $shuffled = FALSE;

 /**
  * Loads the objects this QueryResult is supposed to hold
  *
  * @return void
  */
 protected function initialize() {
  parent::initialize();
  if (!$this->shuffled) {
   shuffle($this->queryResult);
   $this->shuffled = TRUE;
  }
 }
}

Now you can just use the RandomQueryResult class with your query and you will get the expected query results in random order.

$result = $this->objectManager->get('Vendor\Extension\Path\RandomQueryResult', $query);

Note: The original version of the blogpost contained a version with much more code (see revisions here), where I implemented a new class based on QueryResultInterface.

Monday, March 31, 2014

TYPO3 - Extension tv2fluidge now with support for multilingual websites

For some month ago I published an article about the first version of my extension tv2fluidge, which helps migrating content of a TYPO3 website made with TemplaVoila to Fluidtemplate and GridElements. The first version of tv2fluidge still had some open issues, which I resolved in the meantime.

First of all, I raised the version compatibility level to TYPO3 6.1, since I used the extension to successfully migrated a TYPO3 6.1 website made with TemplaVoila. Also I found some small bugs, which also have been fixed. The last big task was the migration of a multilingual website made with TemplaVoila.

So I started to migrate  a multilingual TYPO3 4.7 website made with TemplaVoila to Fluidtemplate and Grid Elements. After I had processed all 3 migration steps with the webiste, I was a little bit disappointed. The FCE and content migration for the default language worked as expected, but translated content element were not in the right order and the migrated GridElements were messed up when it comes to translated content in Grid Elements columns. Also I had some trouble with Grid Elements, where the original TemplaVoila FCE had the language set to "all languages", because the Grid Element columns in the TYPO3 backend showed all content elements for all languages mulitple times. After some research, I found out that those problems seem to be fixed in later versions of Grid Elements, but not in the version available for TYPO3 4.5 and 4.7.

Below is a screenshot of a TemplaVoila page with a Flexible content element and translated page content.

Original page and Flexible Content Element
Atfer the migration, the resulting page and grid element looked like shown on the next screenshot.

Page and Grid Element after migration
As you can see, the Grid Element with the language set to "all languages" shows content for all languages. Also the sorting of the translated content elements is'nt correct when you compare it with the original conent elements for the default language.

So in order to migrate my multilingual TYPO3 websites made with TYPO3 4.7 I had to find a solution how to automatically migrate and reassign child content elements for Grid Elements with has "all languages" configured. Also I had to find a way how to fix the sorting of translated content elements.

Handling Grid Elements with language set to "all languages"

I came to the decission, that it would be best to have an individual translated Grid Element for each page language. Having this, I could reassign all translated child content elements to the individual translated Grid Elements.

The updated version of tv2fluidge contains a conversion utility to handle exactly this situation. It searches all Grid Elements, where the language ist set to "all languages" and then clones those Grid Elements to the amount of translations for each individual page. Then it reassigns all child content elements to the desired columns of the translated Grid Elements so you end up with a clean translated content structure in the TYPO3 page module.

Page view, where the Grid Element has been cloned to each individual language
and translated content elements reassigned
The list module for this page shows how the Grid Element and the content elements are associated.

Listview for the page with the Grid Element


After conversion, there is ony one thing you have to do manually. If the original Flexible Content Element had FlexForm settings (e.g. input-fields or images), you must manually migrate the content and reconfigure the Grid Element as described in the extension manual.

Fix the sorting of translated content elements

In order to get the correct sorting of translated content elements I have created a module for tv2fluidge, which fixes the sorting for all translated content elements by setting the database field "sorting" to the sorting of the original content element multiplied with the uid of the language of the translated content element.

After processing all pages with the new "Fix sorting" module in tv2fluidge the sorting of the translated content elements finally looked good.

Page view with fixed sorting

The new version of tv2fluidge is available on TER and GitHub and I already used it to migrate Websites made with TYPO3 4.5 LTS, TYPO3 4.7 and TYPO3 6.1. As the long awaited TYPO3 6.2 LTS has been released last week, I can start planning the first migration projects (TYPO3 4.5 with TemplaVoila-> migrate to FluidTemplate and Grid Elements -> migrate to TYPO3 6.2 LTS). Now I just have to wait until the major extensions have raised compatibility to TYPO3 6.2 LTS.

Monday, March 17, 2014

TYPO3 - suddenly unable to login to backend

Last week I had a really strange problem with one of my TYPO3 websites. A colleague came to me and said he was unable to login to the TYPO3 backend. I tried to login with my own TYPO3 backend account and experienced the same problem.

First I thought the TYPO3 site could have been hacked, so I took a look into the be_users and sys_log tables of the TYPO3 installation but could not see anything suspicious. Also the webservers logfiles did'nt show any errors. I then logged into the TYPO3 install tool and created a new admin backend user for the TYPO3 site. With this user, I should be able to login to the TYPO3 backend... well, at least I thought so. But also with the new admin account I was'nt able to login, so something was really wrong with the TYPO3 website.

Again I looked into the be_users table and saw, that the newly admin account had a normal MD5 hash in the password field. The site used rsaauth and saltedpassword and normally both extensions should be able to distinguish between passwords with MD5 hashes and password with salted hashes, but obviously not on this TYPO3 website. I therefore removed both rsaauth and saltedpasswords, resetted the loginSecurityLevel to "normal" mode in the TYPO3 install tool and was finally able to login to the TYPO3 backend with my new admin user.

So the login problems must have something to do with saltedpasswords and rsaauth. First I checked the path, where rsaauth writes its temporary data, but could not see anything special there. Next I wanted to check the database table, where rsaauth stores the private keys and finally came to the solution of this problem.

The database table tx_rsaauth_keys was marked as crashed and could not be repaired automatically. So the rsaauth extension was unable to write its private keys to the database and therefore the rsaauth login never succeeded. After I reparied the crashed table manually and reenabled rssauth and saltedpasswords, everything worked fine again.

Friday, February 21, 2014

TYPO3 - Conditionally add an additional wrap to RTE links using Typoscript

In a project I needed to enable the editor to create links in RTE, that automatically should get a wrap based on the class the link has.

Assume the editor creates a link in RTE and selects the link class "myClass". The resulting HTML output is:

<a href="target-page-id" class="myClass" title="sometitle">My Link</a>

My CSS styling now required, that the a-tag must be surrounded with a div-tag that has a special class. My final output should look like this:

<div class="anotherClass">
  <a href="target-page-id" class="myClass" title="sometitle">My Link</a>
</div>

As I did'nt want to bother the editor with special frames and layouts for the RTE text, the additional class should be added automatically as soon as the link has the special class name.

Well, what sounds simple, can be hard to process...

I asked on stackoverflow but did'nt get an answer. After some research, I found this article on TYPO3 wiki, which pointed me to the right direction. I did some hours of Typoscript debugging and finally managed to get a working solution.

lib.parseFunc.tags.link {
  typolink.parameter.append = LOAD_REGISTER
  typolink.parameter.append {
    linkClass {
      cObject = TEXT
      cObject {
        stdWrap.data = parameters:allParams
      }
      # Split link params by space-char. 3rd value is the link class name
      split {
        token.char = 32
        # Option for TYPO3 7.6+ below
        cObjNum = 1||2||3||*
        # Option for TYPO3 6.2 LTS
        #cObjNum = 1||2||3
        3 = TEXT
        3.current = 1        
      }
    }
  }
  newWrap.cObject = CASE
  newWrap.cObject {
    key.data = register:linkClass
    # Set outer wrap for links depending on class name
    default = TEXT
    default.value = |
    myClass = TEXT
    myClass.value = <div class="anotherClass">|</div>
    internal-link = TEXT
    internal-link.value = <div class="anotherClassForInternalLink">|</div>
  }
}

lib.parseFunc_RTE.tags.link {
  typolink.parameter.append < lib.parseFunc.tags.link.typolink.parameter.append
  wrap < lib.parseFunc.tags.link.newWrap
}

TYPO3 is just so powerfull and extendable that you never finish learning.

Monday, January 6, 2014

TYPO3 - In-Place migration from TemplaVoila to Fluidtemplate and Grid Elements


In the past few years I have made several websites with TYPO3 4.5 LTS and TemplaVoila. The new LTS of TYPO3 is going to be released march 25th, 2014 and there will surely also be a version of TemplaVoila, which is compatible with TYPO3 6.2 LTS, but is TemplaVoila a future-proof solution that will be supported by the community?

When Tolleiv wrote in his blogpost, that TemplaVoila won’t be actively distributed and supported any more by him, I stopped using it for new website projects and switched to Fluidtemplate and Grid Elements which both work great.

I asked myself what to do with the TYPO3 websites I have made with TemplaVoila? Is it maybe possible to migrate a TemplaVoila website to Fluidtemplate and Grid Elements? Or should a website based on TemplaVoila be built up completely new from scatch if you want to switch the template engine?

Starting to test a migration

I started to test a migration from TemplaVoila to Fluidtemplate and Grid Elements on some of my websites. Doing so, I quickly came to a point where I was frustrated and about to drop the migration process, because I had to do a lot of work manually. After I created all Fluidtemplates and Grid Elements, I had to reassign the content elements from TemplaVoila content columns to the backend layout Fluidtemplate content columns, since not all TemplaVoila columns could be automatically migrated to the corresponding content column in the backend layout. Also I had to manually migrate content and FlexForm content for all Grid Elements I created. At this point, I started to create the TYPO3 extension sf_tv2fluidge, which helped me to automate some tasks in the migration process.

Removing unreferenced content elements

The first thing I stumbled across in the migration process were unreferenced content elements. I have seen several websites, were the "Non-used elements" tab in the TemplaVoila page view contained many, many records (sometimes more than 50 elements), because users thought, that those elements have been deleted. Well, actually they are just unlinked and not visible, but still present on the page. So the first thing I had to do during the migration process to Fluidtemplate was to remove all unreferenced elements, because Fluidtemplate does not know anything abount unreferenced content. Since it is not very efficient to remove all unreferenced elements manually, I created an action for sf_tv2fluidge, which recursively for all pages marked all unreferenced elements as deleted.

Migrating TemplaVoila mapped content to Fluidtemplate

I used to create several page templates with different amount of content columns with TemplaVoila. While migrating to Fluidtemplate, I found out, that TemplaVoila mapped content elements could not always just be migrated to the corresponding content column of a Fluidtemplate backend layout. For smaller websites with just one TemplaVoila content column, the migration of all content elements was easy and I did not have to reassign the column position of the content elements, but for more complex templates with multiple content columns the result was mixed up and content did'nt show up in the corresponding content column of the backend layout. Also the sorting of the content elements was not the same as in TemplaVoila.

Content migration from TemplaVoila to backend layouts with Fluidtemplate

I therefore created a content migration helper in sf_tv2fluidge which allows to assign TemplaVoila content columns to backend layout content columns and finally migrate all affected content elements to the target content columns and keep the sorting of the content elements. Also the helper sets the corresponding backend layout for the matching pages.

TemplaVoila references

One nice feature of TemplaVoila is the ability to create references to content elements. Sadly, my newly created content migration helper did not migrate referenced content, so I digged deeper into the functionality of that feature in TemplaVoila.

When TemplaVoila creates a reference to a content object, it just saves the uid of the referenced content element in an XML node. In this XML node, also all other uids from content elements on the corresponding content column are saved. The sorting of records is just as the uids are ordered in the XML node. So the original content element remains on source the page and the reference is just evaluated by TemplaVoila when rendering content in frontend or displaying content elements in the backend page module.

The traditional way of referencing content in TYPO3 is to create a shortcut to an content element by using the "Insert record" content element. This actually creates a new record in the tt_content table which holds the uids to the referenced content objects. Also it contains the column position and the sorting.

So doing the content migration I had to create a new shortcut for each TemplaVoila reference and also respect the sorting of all content elements in the TemplaVoila content column.

Migrating TemplaVoila Flexible Content Elements to Grid Elements

The last big task was releated to TemplaVoila Flexible Content Elements. I normally used Flexible Content Elements when I wanted to enable the site editor to add dynamic content structures to a page. Examples for Flexible Content Elements are elements with muliple columns, sliders or accordions.

As Flexible Content Elements are part of TemplaVoila, they also need to be migrated when you want to use Fluidtemplate as your templateengine. The best approach to do this, is to use Grid Elements, which supports the same XML structure for flexforms as TemplaVoila does. So it should at least be possible to migrate the content from Flexible Content Elements to Grid Elements.

Now you could just copy the flexform structure of a Flexible Content Elements to a new Grid Element and try to get things working, but this approach is really not recommended. Grid Elements integrates directly into the TYPO3 page module and the user can for example use drag and drop with content elements directly on Grid Elements. By just copying the flexform XML structure of your Flexible Content Element to a new Grid Element, you will loose some advantages of Grid Elements. So you have to look at each Flexible Content Element individually and choose the best matching approach (e.g. recreate, migrate flexform or mixed recreation/flexform migration).

When all Grid Elements have been created, content must be migrated. Here I faced a different situation as for normal page content. On one side, a Grid Element can have content columns, where content elements from Flexible Content Elements should be remapped. On the other side, a Grid Element can have a flexform XML structure, which is used to allow the user to input content. And finally, a Grid Element can also be a combination of both content columns and flexform.

Migration from Flexible Content Elements to Grid Elements


I added a Flexible Content Element to Grid Elements migration helper to sf_tv2fluidge, which tries to respect all 3 scenarios described above, keeps care of referenced content, migrates all content and user input made through flexform and finally converts the Flexible Content Element in the tt_content table to a Grid Element.

Screencast of a in-place migration

Well, by now this article was very theoretical and I think it is hard to show a complete site migration by screenshots, so I created a screencast which shows a complete migration process of a demosite, which I created for this article.


Conclusion

As you could see in the screencast, it is possible to migrate an existing TYPO3 website made with TemplaVoila to Fluidtemplate with Grid Elements. You will of course have to do some work by creating Fluidtemplates and Grid Elements, but can benefit from sf_tv2fluidge which helps you to automate several migration steps.

I'm pretty sure, that not all websites can be migrated as smooth as shown in the screencast, since I did not test the migration of a multilingual website and also I did not test Flexible Content Elements with containers for elements.

References

1. Extension on GitHub: https://github.com/derhansen/sf_tv2fluidge
2. Extension on TER: http://typo3.org/extensions/repository/view/sf_tv2fluidge