Saturday, March 16, 2013

Setting up Jenkins CI, Selenium grid and PHPUnit Selenium to perform integration testing

When developing bigger TYPO3 websites with a lot of own extensions and complex functionality, it is nescessary to make sure, that the integration of new features or changes to existing code does not break the functionality of the website.

To meet those requirements, it is recommended to use a continuous integration platform (like Jenkins CI) to automate the testing of the software. The platform can be used to automatically run the unit tests of your TYPO3 ExtBase extensions. If you use the testing framework included in the TYPO3 extension "phpunit", the tests can also help you testing your code with real data from the database.

Another thing you can (and should) test is the website and it's functionality itself. To do so, you can use a browser automation tool to run automated tests against real browsers. One tool available is the Selenium Server.

In this article I will show you how to build up a continuous integration solution consiting of Jenkins CI, Selenium Grid and 3 nodes with different webbrowsers and operating systems. Finally I will show you how to create some simple selenium tests with PHPUnit selenium and show, how to automatically run them against different environment configurations. Please note, that I will not go into deep details installing and configuring each software.

Setting up Jenkins CI and Selenium Grid

First of all, you need to install Jenkins CI on a server. For this article, a fresh Debian Server has been installed with all dependencies for Jenkins CI and finally, the latest release of Jenkins CI has been downloaded from the Jenkins CI homepage. Installation and configuration is really simple as described here. After installation and configuration, Jenkins CI is ready for use. To run PHPUnit tests, make sure you have installed PHPUnit, PHPUnit Selenium and all necessary extensions you need to run your tests.

The next step is to install and configure Selenium on the Jenkins CI server. This instance of Selenium will run Selenium Grid, which will act as the master Selenium grid hub, where all other Selenium nodes connect to. Open the Jenkins Plugin manager and install the Selenium plugin. Installation is really easy and you just have to install the plugin and restart your Jenkins CI. In the Jenkins CI web interface you now have the new menu "Selenium grid" as shown on the screenshot below.


Selenium Grid is ready to handle nodes. Now it is time to configure the Selenium nodes.

Configuring the Selenium nodes

For this article, 3 virtual machines with different browser configurations have been created and configured.

  • Windows XP 32 bit with the following webbrowsers
    • Internet Explorer 8
    • Firefox 19
    • Opera 12
    • Chrome 25
  • Windows 7 32 bit with the following webbrowsers
    • Internet Explorer 9
    • Firefox 19
    • Opera 12
    • Chrome 25
  • Ubuntu 12.10 64 bit with the following webbrowsers
    • Firefox 19
    • Chrome 25

For all virtual machines, JAVA and the browsers listed above has been installed. Chrome, Opera and Internet Explorer requires drivers, so the locally installed Selenium Server can remote control the local webbrowser. Those drivers can be downloaded here or directly via the Selenium homepage. Finally, the latest release of  Selenium has been downloaded to the machines.

For all nodes, the following command has been used to start Selenium.


java -jar \path\to\selenium-server-standalone-2.29.0.jar -role node -hub http://jenkins-server:4444/grid/register -browser "browserName=internet explorer,version=8,maxInstances=1" -browser "browserName=firefox,version=19,maxInstances=5" -browser "browserName=opera,version=12,maxInstances=5" -browser "browserName=chrome,version=25,maxInstances=5"


The node connects to the master Selenium hub and registers the local browsers to the hub. Note, that the parameter "-browser" does not accept spaces in between the individual arguments.

After all nodes have been configured and the local Selenium Server has been started, the Selenium Grid plugin in Jenkins CI should show all registered nodes as shown on the screenshot below.


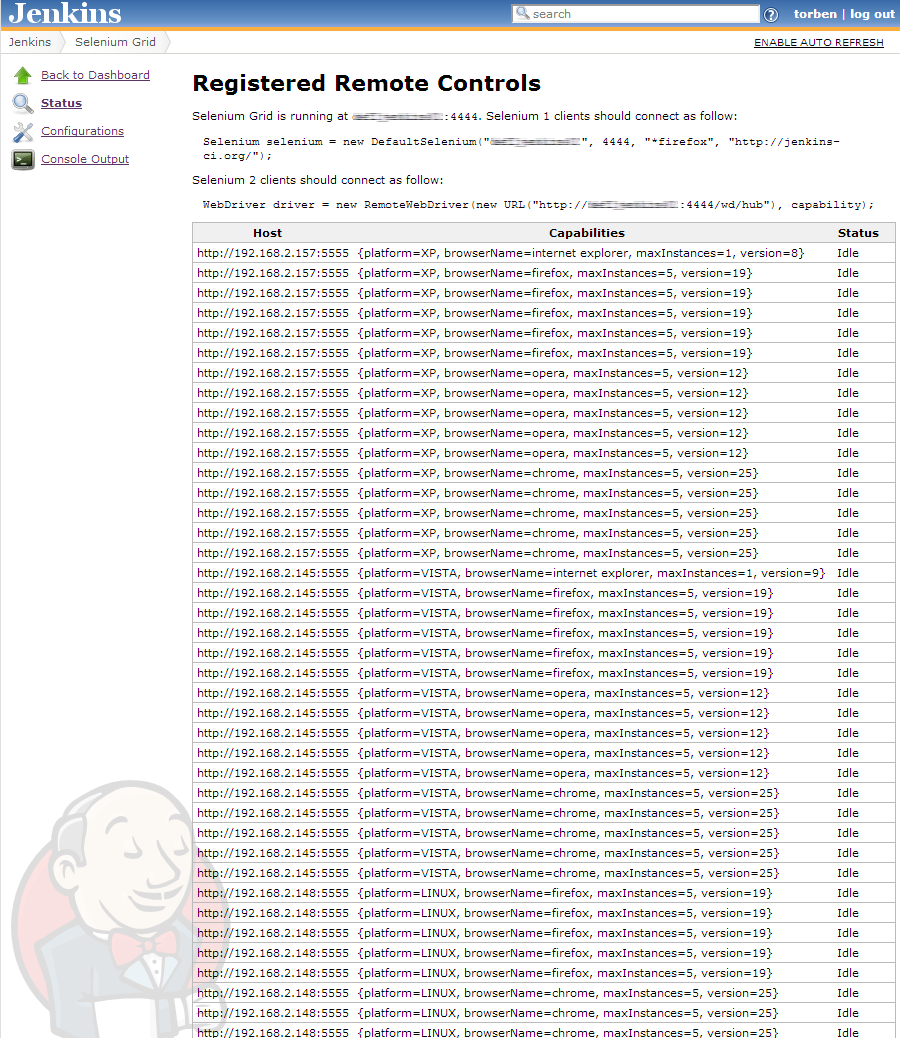
The Selenium Grid and all nodes are now ready for usage.

The first Selenium tests

Now you are ready to write the first test. Create a new PHP file (selenium-tests.php) and include the following contents.

<?php
class DefaultTest extends PHPUnit_Extensions_Selenium2TestCase {

    /*
     * Setup
     */
    protected function setUp() {
        $this->setHost('your-jenkins');
        $this->setBrowser('internet explorer');
        $this->setBrowserUrl('http://www.google.com');
    }

    /**
     * @test
     */
    public function testTitle() {
        $this->url('http://www.google.com');
        $this->assertEquals('Google', $this->title());
    }
}
?>

Use the setHost() method to set the hostname of your jenkins. This can be an IP-Address or a hostname. Do not include any ports - PHPUnit Seleniums does this for you.

Before setting up a job in jenkins (which I do not show in this article), you can run the test locally by using the following command.

phpunit selenium-tests.php

Now the test is sent to the Selenium Grid server and executed an a node matching the desired browser.

The result should look like shown below

PHPUnit 3.7.13 by Sebastian Bergmann.

.

Time: 6 seconds, Memory: 6.00Mb

OK (1 test, 1 assertion)

Now we want to execute the test on a node with Internet Explorer version 8. To do so, we need to set the desired capabilities of the test. Modify the file selenium-tests.php to the following:

<?php
class DefaultTest extends PHPUnit_Extensions_Selenium2TestCase {

    /*
     * Setup
     */
    protected function setUp() {
        $this->setHost('your-jenkins');
        $this->setDesiredCapabilities( array('version' => '8') );
        $this->setBrowser('internet explorer');
        $this->setBrowserUrl('http://www.google.com');
    }

    /**
     * @test
     */
    public function testTitle() {
        $this->url('http://www.google.com');
        $this->assertEquals('Google', $this->title());
    }
}
?>

Now run the test again and you should see on the Windows XP machine, that Internet Explorer 8 is launched and the URL www.google.com is opened.

That's all. You can modify the desired capabilities to suit the needs of your tests. Since the parameter accepts an array, you can also set the browser version and the target platform together.

The last step is to check in your tests to a repository (e.g. GIT) and setup a new job in Jenkins to execute the selenium tests periodically.

Saturday, March 2, 2013

Integrating a JQuery Cycle image slider in TYPO3 6.0 without the need of installing an extension

There are a lot of JQuery image slider or slideshow extensions in TYPO3 TER, which (hopefully) all do work very well. Integration is mostly very easy - just install the extension, include some static TS and configure the plugin and there you go with a nice "Out of the box" Image Slider. Thit is surely good for a lot of people using TYPO3.

But some extensions come with their own included version of JQuery, which can't be disabled. Others include a lot of inline CSS and/or JS into the frontend, which also can't be disabled. And some extensions do not work correctly with TYPO3 6.0.

On the way looking for the "perfect" solution for a JQuery Image Slider in TYPO3, I decided not to use an extension (no worry about extension updates, breaking changes or incompatibility), but integration the slider directly into the TYPO3 website using default and well known TYPO3 techniques. The advantages of this is: full flexibility, easy administration and easy usage for editors.

This article shows how to create a JQuery image slider using Jquery Cycle, which is generated from a normal TYPO3 image content element. The slider includes a bullet navigation depending on the number of images.

Prerequisites
You need a working TYPO3 6.0 (lower versions should work as well) installation with CSS Styled Content installed and at least one template, so you actually are able to insert content on a page and see it's output in the frontend.

Integration into TYPO3
First of all, you need download the JQuery Cycle Plugin and upload it somewhere in your fileadmin directory (in this example fileadmin/templates/js/jquery.cycle.all.js).

Next, create a new JS file (fileadmin/templates/js/slider.js), where you put the JS for the JQuery Cycle slider. Insert the following content to the file.

$(document).ready(function () {
    $(".imageslider .csc-textpic-imagewrap").cycle({
        fx:'fade',
        pause:1,
        pager:'.slidernav',
        pagerAnchorBuilder:function paginate(idx, el) {
            return '<a class="' + idx + '" href="#" >•</a>';
        }
    });
});

Now, include the JQuery Cycle Plugin and the newly created JS file to your template. If you have not already included a version of JQuery to your site, make sure to include one.

page.includeJS {
  jquery = http://ajax.googleapis.com/ajax/libs/jquery/1.8.3/jquery.min.js
  jquery.external = 1
  cycle = fileadmin/templates/js/jquery.cycle.all.js
  slider = fileadmin/templates/js/slider.js 
}

The slider also requires some CSS for positioning of the bullet navigation. Include the following CSS to your sites CSS file.

.imageslider {
    position: relative;
    width: 300px;
    height: 225px;
    overflow: hidden;
}

.slidernav {
    position: absolute;
    z-index: 10;
    top: 170px;
    right: 20px;
}

.slidernav a {
    text-decoration: none;
    color: #ffffff;
    font-size: 40px;
    margin: 0 0 0 5px;
}

.slidernav a.activeSlide {
    color: #bbbbbb;
}

/* remove default bottom margin */
.imageslider .csc-textpic-image {
  margin: 0;
}

Please notice, that in this example I set the width and height of the image slider to a width of 300 pixel and a height of 225 pixel. This is'nt really necessary, but it makes it easier to position the bullet navigation to the bottom right.

As I don't like to override the default settings of CSS styled content or tt_content, I create a new frame, which the editor can select in the frame-dropdown of each content element.

Include the following to your root Page TSConfig.

TCEFORM.tt_content.section_frame {
     addItems.100 = Slider 
}

Now you must enable the new frame and include the HTML tags for the slider with the following TS.

tt_content.stdWrap.innerWrap.cObject {
  100 = TEXT
  100.value = <div class="imageslider"><ul class="slidernav"></ul>|</div>
}

That's all - the JQuery Cycle image slider is now ready for usage.

Usage
Create a new content element with images only and insert some images.


Set the "Indentation and Frames" to "Slider", the width of the images and the image alignment to 1 column.

Save the content element and you're done.

If you open the page in the frontend, you should see an image slider like shown on the screenshot below.


Conclusion
I hope this article gives you a perspective on what is possible with TYPO3's image content element and just some lines of TS, JS and CSS. If you want a next and previous button for the slider, no problem - just use the "prev" and "next" option of JQuery Cycle plugin.

As you have seen, it is not always necessary to install an extension to integrate an image slider to TYPO3. With the shown solution, editors can use TYPO3's default content elements and the site administrator has full control of the sliders features and can use all nice options of the JQuery Cycle plugin.

Please notice, that everything shown in this article is just an example on how a JQuery Cycle image slider could be integrated into TYPO3. Feel free to modify the settings to your own needs.

Update 15.05.2013
You have to make sure that the JS file, which enables the JQuery Cycle slider, gets the DIV-tag, which contain the container elements for the images. Below is an example for images, which are aligned "above, center". The second line contains the part, where you select the DIV with elements to cycle.

$(document).ready(function () {
    $(".imageslider .csc-textpic-center-inner").cycle({
        fx:'fade',
        pause:1,
        pager:'.slidernav',
        pagerAnchorBuilder:function paginate(idx, el) {
            return '';
        }
    });
});